
AI image-to-video tools can animate still images in the blink of an eye while providing endless options for customization. Unfortunately, if the image quality is subpar, the result will be too, despite prompt switches or motion strength adjustments.
As a result, it is essential to understand that the best image for AI image-to-video generation is the foundation to ensure clean motion and stable subjects.
In this guide, we will help identify the common failures, best practices, and what improves your results.
Why Your Image Matters More Than the Prompt
Many people are under the impression that prompts are the “brain” of AI video generation. In reality, the image is what the model needs to structure the animation. The AI isn’t coming up with the motion itself. It is guessing the possible ways of movement of the pixels that exist.
Understanding that means:
- A neat image produces motion that is easy to predict.
- Rough images lead to distorted animations.
- Complex images lead to confusion for the AI.
- Simple images improve stability.
When people say “the video looks weird,” it typically is not the tool that is the problem. It’s the input image.
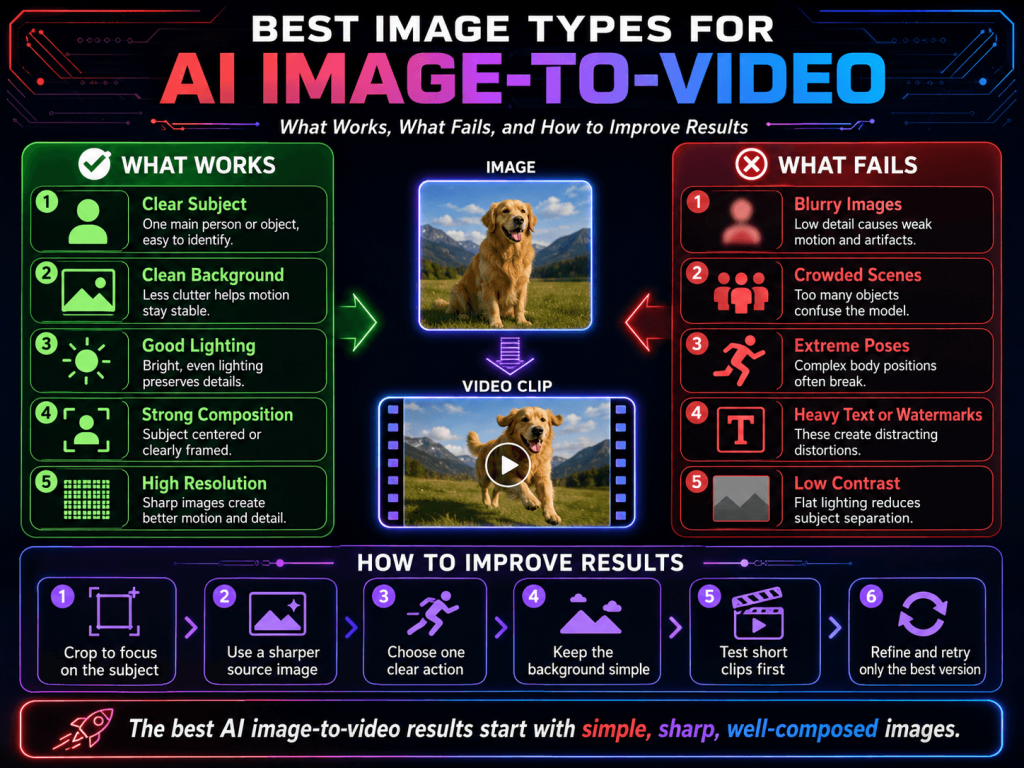
What Makes the Best Image for AI Image-to-Video
Some images are better interpreted by AI because they contain certain characteristics which are;
1. Clear subject focus (single subject works best)
The best images contain one dominant focal subject, rather than a multitude of subjects. One person, one object, or one focal point is a better example in this case. Also, it is better if the background is separated.
When multiple subjects fight for the AI’s attention, improper blending, incorrect AI prediction, and cartoony motion are frequently the result.
2. Good lighting with visible details
Good animation quality depends on good lighting, typically even across a subject. There should not be any shadows obstructing facial features. Lighting that is overexposed usually removes subject detail. If good lighting is not present, the AI is forced to guess the missing information, which creates flickering, unnatural motion, and a drawn-out cartoony effect.
3. High resolution and low noise
Poor-quality images are one of the ways to ruin output. Examples of what to avoid for subject creation include:
- Blurry images
- Pixelated screenshots
- Heavy compression (like WhatsApp re-sends)
- Grainy night photos
AI video relies on clear edges and clear subjects. Blurry subject edges create shaky or warped animation.
4. Natural pose and stable composition
As a rule, the more natural the motion, the more accurate the AI animation will be. Composition should avoid elongated and dangerously warped perspectives.
Limb shortening, or other cropping of the subjects makes motion prediction confusing and causes a failed attempt at creating clear animation. These compositions typically contain warped limbs and cartoony motions.
5. Clean background with low complexity
A lot of people overlook how a good background can affect a picture or a video. Things that can help are:
- If there are fewer things in the background
- Blurred formats and gradients
- Simple indoor settings
A busy background can cause a lot of unwanted movement.
6. Proper framing and aspect ratio
How you frame your picture and what part of the drawing surface is being used to show your picture determines how the AI interprets movement.
Good setups are:
- Centered subject (best for stability)
- Portrait framing for vertical video (9:16)
- Wide framing for cinematic motion (16:9)
If the subject is too close to the edge, AI may crop or distort movement during animation.
What Types of Images Perform Poorly
Here are a few things that break the AI image-to-Video generator.
1. Overcrowded group images
When there are too many people (or subjects), images become more vague or undirected. The AI has issues determining who and/or what should move.
2. Heavy filters or AI-generated distortions
Using an AI-altered image can worsen the output. It can end up being a game of “who can distort the image more?” That requires editing the image again.
3. Extreme motion already in the image
If the image is currently blurred or has motion and/or temporal streak effects, the AI will usually amplify that mess. The AI will cause even more disruption.
4. Low-light or night photography
Dark images result in poor structure, and this causes issues with face and object animation.
5. Cropped or incomplete subjects
If the image is cropped and missing part of a body, or an element that is off-frame, this confuses AI prediction and creates unnatural animation.
How to Improve Any Image Before Uploading
In order to get the best results out of imperfect images, a few adjustments can be made. Tips for quick image cleanup:
- Adjust brightness for underexposed images.
- Apply a slight sharpen filter on edges.
- Adjust the crop to center the subject.
- Remove distracting background elements.
- Upscale low-resolution photos.
While these adjustments help improve clarity, it is okay not to aim for perfection.
The Role of Prompt + Motion Settings (Quick but Important)
This guide is designed specifically for images, but it is important to note that adjustments in settings are also crucial.
A good combination of all the tips would be:
- A simple prompt that only suggests the subject is in motion.
- Low to medium motion strength to maintain realism.
- A methodical and stable camera movement to avoid too many directional changes.
- A short, quiet duration for first tests (3–5 seconds).
When the image is clear, detailed prompts are not needed as they often reduce quality.
Simple Checklist for the Best Image for AI Image-to-Video
Before you generate, confirm the following:
- There is one clear subject.
- The image is sharp and of high quality.
- The lighting is clear and balanced.
- The background is as simple as possible.
- The subject is completely visible and not cropped.
- The image matches the intended video orientation.
If most answers are “yes,” consider your input strong.
A Simple Workflow That Actually Works
Stop guessing and start following a process that gets results:
- Find a clear, quality image.
- Crop to center the subject.
- Reduce background distractions.
- Use small and simple motion prompts.
- Use the lowest motion strength.
- Start by generating a short clip.
- Make sure that you only change one thing at a time.
Adjusting one thing at a time helps avoid random results and maintains the quality most productively.
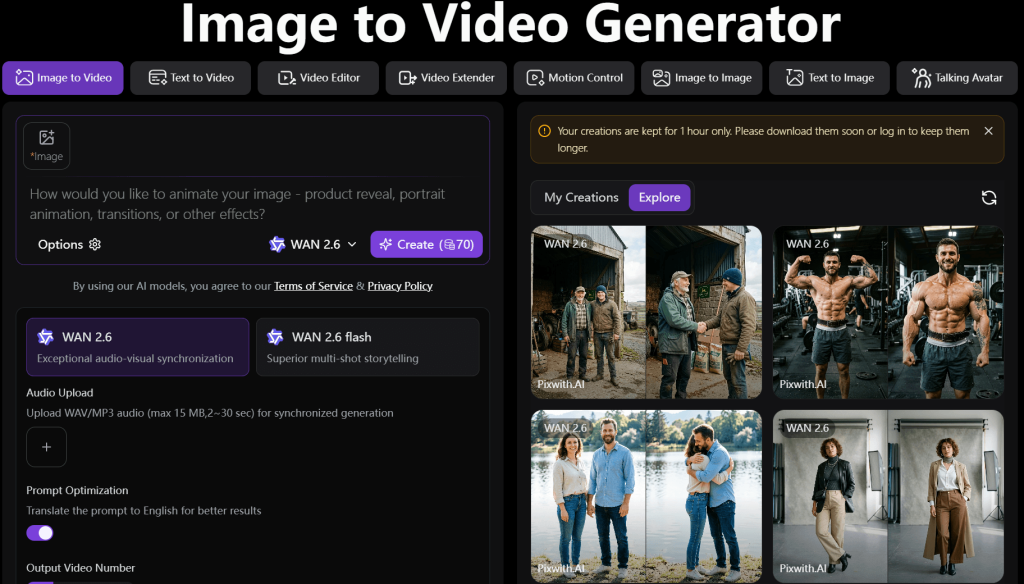
Where Tools Like Pixwith Fit In
Having the perfect image doesn’t always work because many programs have too many things to set, too many confusing buttons, and too many unnecessary features. Having a tool that makes a simple image-to-video program easier to understand is where tools like Pixwith help, because they give a simple image-to-video system.
If your target is to concentrate on creations rather than the configurations, then trying the same image-to-video workflow in Pixwith will also make the creations simple and fast.
Conclusion
The best image for AI image-to-video is about having an image that looks clear, simple, and very structured, and doesn’t look like it came straight out of a professional camera.
Having this on your side will help you gain a great deal of control. It’s much better to have a simple, clean image than to try to make a bad image look better by controlling the AI. If you want to have the best control in your output, it helps to not have bad images. It’s much better to spend that time on good inputs.